A while back I read this article on TheAtlantic.com about how swapping our beef consumption for bean consumption would make a huge impact on greenhouse gas emissions. According to the article, "If every American made one dietary change: substituting beans for beef. They found that if everyone were willing and able to do that—hypothetically—the U.S. could still come close to meeting its 2020 greenhouse-gas emission goals... That is, even if nothing about our energy infrastructure or transportation system changed—and even if people kept eating chicken and pork and eggs and cheese—this one dietary change could achieve somewhere between 46 and 74 percent of the reductions needed to meet the target."
This statistic has stuck in my head, and I've been striving to eat more vegetarian meals at home (even though we rarely cook beef, I figure replacing beans for other animal protein also helps the cause!). I know it's hard for people to make the switch from the standard meat + starch + vegetable = dinner equation, so I thought I would share a few favorite bean and lentil recipes that make great main dishes for weeknight meals.
Deborah Madison's Lentil Salad (above) from the original Greens Cookbook is a classic. Find the recipe on Food52.com (photo by Mark Weinberg).
I've been making Heidi Swanson's White Beans and Cabbage for years—it's a great one-dish meal. (Also a great way to use all the cabbage I got in this year's CSA!)
Pair this chickpea and cauliflower dish with a big green salad and you've got a hearty dinner.
Another long-time favorite is Melissa Clark's Red Lentil Soup with Lemon. Read her commentary, if you need convincing.
Melissa has a ton of bean and lentil dishes in her new book Dinner: Changing The Game that I am dying to try, including this Black Bean Skillet Dinner.
A recipe inspired by the late great Chickpea Sandwich that used to grace the menu at 'wichcraft, and a excerpt of the original recipe from Tom Colicchio's book.
Amy Chaplin's Soaked Oats and Chia
Thursday, July 09, 2015
Here's an ideal breakfast for the hot and humid mornings we've been having in New York City this week: Soaked Oats and Chia from Amy Chaplin's excellent At Home in the Whole Foods Kitchen. I bought this book over the winter, and I've done quite a bit of cooking out of it in the months since. The thing I love about this book is that it give me new ideas. Soaked rolled oats for breakfast? I'd never eaten them before Chaplin suggested it.
Yesterday, Amy Chaplin posted a lovely video of this recipe on her Instagram account, and it reminded me to start another batch. Double (or triple!) the batch and keep it in your refrigerator for a week's worth of healthy, easy breakfasts. Here's the recipe from the book below. Once you've made it a few times, you won't even need to look at the written instructions
Soaked Oats and Chia
With Almond Milk, Flax, and Wheat Germ
"Creamy, light, and satisfying, this has been my staple warm-weather breakfast for many years. It’s just right for busy mornings, as it is best made ahead of time and travels well in a small jar. I recommend eating it at room temperature, so if you remove a portion from the fridge as soon as you get up, it’ll be ready by the time your breakfast hour rolls around."
Ingredients:
• 3/4 cup regular rolled oats
• 2 tablespoons chia seeds
• 1 tablespoon ground flax seeds
• 1 tablespoon wheat germ
• 1/4 teaspoon cinnamon
• 2 cups almond milk
To Serve:
• Fresh berries
• Homemade almond milk
• Maca root powder, optional
• Hemp seeds, optional
Combine the oats, chia, flax, wheat germ, and cinnamon in a bowl; mix well. Pour in almond milk and stir until everything is evenly combined. Set aside for 20 to 30 minutes at room temperature, or store in a jar and place in the fridge for 8 to 12 hours. The mixture will keep up to 4 days in the fridge. Serve topped with berries, a splash of almond milk, and a teaspoon of maca root powder and hemp seeds if you like. Serves 2.
Photo by Johnny Miller.
Yesterday, Amy Chaplin posted a lovely video of this recipe on her Instagram account, and it reminded me to start another batch. Double (or triple!) the batch and keep it in your refrigerator for a week's worth of healthy, easy breakfasts. Here's the recipe from the book below. Once you've made it a few times, you won't even need to look at the written instructions
Soaked Oats and Chia
With Almond Milk, Flax, and Wheat Germ
"Creamy, light, and satisfying, this has been my staple warm-weather breakfast for many years. It’s just right for busy mornings, as it is best made ahead of time and travels well in a small jar. I recommend eating it at room temperature, so if you remove a portion from the fridge as soon as you get up, it’ll be ready by the time your breakfast hour rolls around."
Ingredients:
• 3/4 cup regular rolled oats
• 2 tablespoons chia seeds
• 1 tablespoon ground flax seeds
• 1 tablespoon wheat germ
• 1/4 teaspoon cinnamon
• 2 cups almond milk
To Serve:
• Fresh berries
• Homemade almond milk
• Maca root powder, optional
• Hemp seeds, optional
Combine the oats, chia, flax, wheat germ, and cinnamon in a bowl; mix well. Pour in almond milk and stir until everything is evenly combined. Set aside for 20 to 30 minutes at room temperature, or store in a jar and place in the fridge for 8 to 12 hours. The mixture will keep up to 4 days in the fridge. Serve topped with berries, a splash of almond milk, and a teaspoon of maca root powder and hemp seeds if you like. Serves 2.
Photo by Johnny Miller.
Vegan Recipes for Everyone
Monday, March 09, 2015
I'm not a vegan and I probably never will be, but I did experiment with being vegan before 6pm (Mark Bittman's part-time vegan eating plan). And I do believe that a plant-based diet is better for our health and the earth. A steak-loving friend of mine recently began dating a vegan, and it reminded me how intimidating it can be to find vegan recipes that feel like a real meal to non-vegans. I thought I'd share three recipes for vegan meals that I have tried and liked--they're hearty enough that you won't miss the meat, and they're all fairly easy to make:
Roasted and Charred Broccoli with Peanuts (above) from a recent of Bon Appetit felt new to me, and was pretty easy to make (though nutritional yeast can be hard to find). If you have a cast-iron pan, use it for this dish, as the recipe suggests. I served this with some black rice with diced, sautéed onions and bell peppers mixed into the rice.
Roasted Cauliflower and Chickpeas with Mustard and Parsley (above right) from It’s All Good by Gwyneth Paltrow (yes, I am recommending a recipe from Gwyneth) is a surprisingly delicious dish for such a simple list of ingredients and a quick prep time. Serve it with a nice big green salad for a rounded meal.
Mark Bittman's own recipe for black bean tacos (above) is another dish that transforms humdrum ingredients into something really yummy. I deviated slightly from Bittman's original recipe, which you can find on Outside magazine's website, using red cabbage instead of green, and letting the cabbage macerate a bit. You can also just skip the tortillas and turn this into a dinner salad: throw the black beans into the cabbage mixture.
Black Bean Tacos
Servings: 4
Ingredients
3 tablespoons olive oil
2 cups cooked or canned black beans, drained
1 tablespoon minced garlic
1 tablespoon chili powder
1/2 teaspoon ground cumin
1 teaspoon salt, plus more to taste
Black pepper to taste
4 cups shredded green cabbage
1 chopped red bell pepper
1 fresh hot green chile (like jalapeño or serrano), minced
1/4 cup chopped scallions
Juice of two limes
1/2 cup chopped fresh cilantro
Directions
1. Heat the oven to 400 degrees. Coat a rimmed baking sheet with one tablespoon of the oil. Stack the tortillas and wrap them in aluminum foil. Combine the beans, garlic, chili powder, cumin, half the salt, and some pepper in a bowl. Mash the mixture with a fork or potato masher; it should still be chunky.
2. Spread the bean mixture out on the prepared pan, drizzle with another tablespoon of oil, and roast, stirring a few times, until the beans are crumbly and crisp in places, 15 to 20 minutes. Transfer the tortillas to the oven with the beans for their last five minutes of cooking.
3. Meanwhile, put the cabbage, bell pepper, chile, scallions, lime juice, cilantro, remaining oil and salt, and some pepper in a large bowl and toss to combine. Taste and adjust the seasoning. Divide the beans among the warm tortillas; top with the cabbage mixture and serve.
Last but not least, Heidi Swanson's White Beans and Cabbage recipe has been in constant rotation at my house since I first cooked it three years ago. You can leave out the Parmesan for a vegan friend, but it does add a richness to the dish that I miss when I subtract the cheese.
Roasted and Charred Broccoli with Peanuts (above) from a recent of Bon Appetit felt new to me, and was pretty easy to make (though nutritional yeast can be hard to find). If you have a cast-iron pan, use it for this dish, as the recipe suggests. I served this with some black rice with diced, sautéed onions and bell peppers mixed into the rice.
Roasted Cauliflower and Chickpeas with Mustard and Parsley (above right) from It’s All Good by Gwyneth Paltrow (yes, I am recommending a recipe from Gwyneth) is a surprisingly delicious dish for such a simple list of ingredients and a quick prep time. Serve it with a nice big green salad for a rounded meal.
Mark Bittman's own recipe for black bean tacos (above) is another dish that transforms humdrum ingredients into something really yummy. I deviated slightly from Bittman's original recipe, which you can find on Outside magazine's website, using red cabbage instead of green, and letting the cabbage macerate a bit. You can also just skip the tortillas and turn this into a dinner salad: throw the black beans into the cabbage mixture.
Black Bean Tacos
Servings: 4
Ingredients
3 tablespoons olive oil
2 cups cooked or canned black beans, drained
1 tablespoon minced garlic
1 tablespoon chili powder
1/2 teaspoon ground cumin
1 teaspoon salt, plus more to taste
Black pepper to taste
4 cups shredded green cabbage
1 chopped red bell pepper
1 fresh hot green chile (like jalapeño or serrano), minced
1/4 cup chopped scallions
Juice of two limes
1/2 cup chopped fresh cilantro
Directions
1. Heat the oven to 400 degrees. Coat a rimmed baking sheet with one tablespoon of the oil. Stack the tortillas and wrap them in aluminum foil. Combine the beans, garlic, chili powder, cumin, half the salt, and some pepper in a bowl. Mash the mixture with a fork or potato masher; it should still be chunky.
2. Spread the bean mixture out on the prepared pan, drizzle with another tablespoon of oil, and roast, stirring a few times, until the beans are crumbly and crisp in places, 15 to 20 minutes. Transfer the tortillas to the oven with the beans for their last five minutes of cooking.
3. Meanwhile, put the cabbage, bell pepper, chile, scallions, lime juice, cilantro, remaining oil and salt, and some pepper in a large bowl and toss to combine. Taste and adjust the seasoning. Divide the beans among the warm tortillas; top with the cabbage mixture and serve.
Last but not least, Heidi Swanson's White Beans and Cabbage recipe has been in constant rotation at my house since I first cooked it three years ago. You can leave out the Parmesan for a vegan friend, but it does add a richness to the dish that I miss when I subtract the cheese.
Labels:
Green Living.
recipe.
vegetarian
Cookbook Review: A Boat, A Whale, and A Walrus
Sunday, January 25, 2015
This past holiday season my family had a no-gift Christmas (which, by the way, worked out splendidly), but I will confess to having purchased myself a little gift just days after the holiday. I had read about Renee Erickson's new book A Boat, a Whale & a Walrus, and when I saw its lovely cover at my local bookstore, I couldn't resist--and I wasn't sorry I didn't. Bon Appetit described the book as having, "an Ina Garten–like blend of effortlessness and luxuriousness that makes you believe that king salmon with walnut tarator will practically cook itself." A big fan of Garten, I was intrigued, but that's not quite an accurate description of the book. Many of the recipes do walk the line between effortless and luxurious, but the comparison between the two ends there.
Erickson was a new-to-me chef when I bought her book. She owns four beloved restaurants in Seattle, and the book is a collection of recipes from the restaurants and her personal life (though it sounds like there is very little distinction between her personal and professional lives--her parents even works for her restaurants!). The book includes inviting glimpses of the restaurants (above), what appears to be Erickson's home and the surrounding area. Even before I'd started cooking from this book, photographer Jim Henken's photos make me want to book a flight to Seattle.
Erickson's cooking style is distinctly French-influenced, and as such it is not for those afraid of fat (there's a LOT of butter in this book). She's also much more serious (and at times almost-but-forgivably snobby) than a cookbook author like Ina Garten. Garten makes me feel like it's okay to pick up a leg of lamb at Costco, but here's Erickson on buying meat, "On a very basic level, finding a butcher you trust—someone you feel comfortable interrogating and who only buys well-raised meat—is a crucial part of cooking." Yes, yes, yes, she's right, I know that, but I will confess we hear all of this so much in our food-obsessed culture, that I don't necessarily want to be preached to in every cookbook I buy. Erickson is also very exacting about the ingredients she calls for, and even provides resources for some of her favorites in the back of the book, which I loved.
The book is broken into four seasons and a section of "staples" recipes. Within each season there are individual menus for everything from a lamb and rosé dinner (with harrissa-rubbed roasted lamb) to a pickling put-up party (a clever way for her to get in all her favorite pickle recipes, which apparently are a highlight at her restaurants). I wished that I'd had the book before the holidays because I would have made her entire holiday menu for my family, but will save it for next year instead. However, picking it up after the holidays, I found I had a week off when it was awfully cold outside, so I cooked a lot of recipes from this book.
Most of Erickson's recipes are excellent. Roasted chicken with capers and preserved lemon was a triumph, though I admit I hesitated to add both a 1/2 cup of olive oil and a 1/2 cup of butter to the pan when my usual Zuni roast chicken uses no fat at all. Grilled rib eye with anchovy butter was exactly the kind of effortless luxury that Bon Appetit described (we cooked that for New Year's Eve). The zucchini bread was probably the best recipe I tried (I confess, I made it with quite-out-of-season squash), and it was so tasty my husband accused me of putting drugs in it because he couldn't stop eating it.
There were very recipes that I wouldn't make again, though a celery root salad was a total miss. I'd also advise against trying to make Erickson's recipes more healthy--just accept them for what they are: treats. After plowing through a bunch of rich dishes, I thought I might lighten up the kale gratin by using some whole milk instead of a full three cups of heavy cream, but the results were a little watery, and in hindsight I should have just enjoyed it as Erickson prescribed.
Overall, I'd say this book is an excellent addition to my cookbook library. It's the kind of book from which I can imagine cooking almost every recipe--not just a handful. (I also recently bought the Prune cookbook, and while I love it as a book, there aren't a ton of recipes that jumped out as make-me-now meals.) It's also filled my head with dreams of a food-filled trip to the Pacific Northwest.
Bean + Protein Dinners
Sunday, December 28, 2014
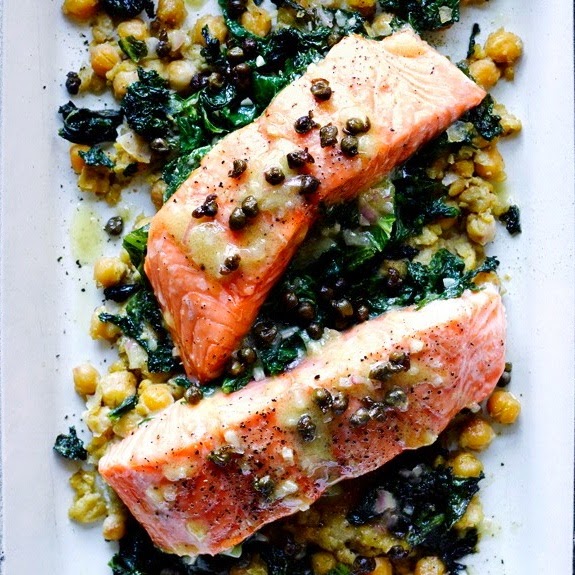
Recently, I tried out two recipes that make use of a can or two of beans paired with a piece of protein that cooks on top of the beans. It's a technique that could be used for an infinite variety of legume and protein combinations. The two dishes I made were very different from one another, but both were delicious: The first is a white bean and lamb dish from the late great Everyday Food, and the second is a Bobby Flay recipe for slow-roasted salmon with chickpeas and greens from Bon Appetit. These are the kind of meals that make a better-than-average weeknight dinner or a fairly impressive entrée for guests.
A few quick notes: I halved the lamb recipe, and I would recommend you stick to the full four-serving version, so you can really get the beans nice and thick and saucy (it worked on a smaller scale, but it got a little dry with less in the pan). For the salmon recipe, I couldn't find mustard greens, so I used a bunch of chard and one bunch of red chard, which worked out beautifully -- I'd definitely do two bunches of greens, not just one. I also upped the garlic to three cloves because, well, I like garlic. Here are the recipes; give them a try:
Lamb and White Beans with Rosemary
From Everyday Food, November 2006
Ingredients:
2 tablespoons olive oil
4 loin lamb chops, (each about 6 ounces and 1 1/4 inches thick)
Coarse salt and ground pepper
1 medium onion, finely chopped
4 cloves garlic, sliced
1 tablespoon chopped fresh rosemary, (or 1 teaspoon dried), plus more for serving (optional)
1/4 to 1/2 teaspoon red-pepper flakes
2 cans (15 ounces each) cannellini beans, drained and rinsed
Instructions:
1. In a large skillet with a lid, heat oil over medium-high. Season lamb generously on both sides with salt and pepper. Place in skillet; cook until browned, 3 to 4 minutes per side (lamb will finish cooking in step 4). Transfer chops to a plate (keep oil in skillet); loosely cover with aluminum foil, and set aside.
2. To skillet, add onion, garlic, rosemary, and red-pepper flakes; season with salt and pepper. Cook, stirring frequently, until onion has softened, 3 to 5 minutes.
3. Add beans, sun-dried tomatoes, and 1/2 cup water. Bring to a boil, then reduce heat to medium-low; cook until mixture is slightly thickened and saucy, 4 to 6 minutes.
4. Place chops on top of beans in skillet (adding any juices that have accumulated on plate). Cover skillet, and simmer until meat is medium-rare, 3 to 4 minutes. Serve chops with beans, and garnish with rosemary, if desired.
Serves 4
Slow-Cooked Salmon, Chickpeas, And Greens
From Bon Appetit, March 2014
Ingredients:
Salmon:
2 tablespoons olive oil, plus more
1 15.5-oz. can chickpeas, rinsed
½ teaspoon ground cumin
Kosher salt and freshly ground black pepper
3 small garlic cloves, thinly sliced
2 bunches small mustard greens, ribs and stems removed, leaves coarsely chopped
1 heaping teaspoon honey
4 6-oz. skinless salmon fillets
Vinaigrette and Assembly:
½ small shallot, very finely chopped
2 tablespoons fresh lemon juice
1 teaspoon Dijon mustard
½ teaspoon honey
Kosher salt and freshly ground black pepper
¼ cup olive oil
¼ cup vegetable oil
2 tablespoons capers, rinsed, patted dry
Instructions:
Salmon:
1. Preheat oven to 250°. Brush a large baking dish with oil. Combine chickpeas, cumin, and 1 Tbsp. oil in a medium bowl. Mash about half of chickpeas with a fork; season with salt and pepper. Transfer chickpea mixture to prepared dish.
2. Heat remaining 1 Tbsp. oil in a large skillet over medium-high heat. Cook garlic, stirring, until fragrant, about 30 seconds. Add mustard greens and cook, tossing, until slightly wilted, about 1 minute. Add honey and ¼ cup water; season with salt and pepper. Cook, tossing, until greens are completely wilted, about 2 minutes. Transfer to dish with chickpea mixture. Season salmon with salt and pepper; arrange over greens and chickpea mixture and drizzle with oil. Bake until salmon is opaque in the center, 30–35 minutes.
Vinaigrette and Assembly:
3. Whisk shallot, lemon juice, mustard, and honey in a small bowl; season with salt and pepper. Gradually whisk in olive oil; season with salt and pepper.
4. Heat vegetable oil in a small saucepan over medium-high heat. Cook capers until opened and crisp, about 30 seconds; drain on paper towels.
5. Drizzle salmon with vinaigrette and top with capers.
Serves 4
Cold-Weather Menu from Lucques
Tuesday, December 02, 2014
Last fall, I made this absolutely delicious menu that ran in Food & Wine magazine. The recipes are from Lucques, a restaurant in Los Angeles that I will be eager to visit the next time I find myself in L.A., based on the caliber of this meal. The restaurant's chef, Suzanne Goin, has also written Sunday Suppers at Lucques, which I'll add to the long list of cookbooks I hope to someday own.
This is a sophisticated yet hearty menu for a cold fall or winter night. I plan to make it again int he coming weeks. It'd be great with Marcus Samuelsson's excellent apple cake for dessert.
From Food & Wine
1/4 cup diced shallots
1/4 cup red wine vinegar
1/4 cup whole-grain mustard
1/4 cup Dijon mustard
3/4 cup plus 2 tablespoons extra-virgin olive oil
Kosher salt
Freshly ground pepper
1 1/2 pounds Yukon Gold potatoes
16 bratwursts
1 teaspoon thyme leaves
2 tablespoons chopped parsley
Citrus-Spiced Red Cabbage (recipe below)
1 bunch of watercress, thick stems discarded
1. In a bowl, combine the shallots and vinegar and let stand for 5 minutes; stir in both mustards. Whisk in 3/4 cup of the oil and season the vinaigrette with salt and pepper.
2. In a pot of salted boiling water, cook the potatoes until tender, 30 minutes. Drain and let cool slightly, then slip off the skins. Break the potatoes into 1 1/2-inch chunks.
3. Light a grill or preheat a grill pan. Grill the bratwursts over moderate heat, turning, until heated through, 10 to 15 minutes.
4. In a large nonstick skillet, heat the remaining 2 tablespoons of oil. Add the potatoes and thyme and season with salt and pepper. Cook over moderately high heat, turning, until golden and crisp, 6 to 7 minutes. Remove the pan from the heat and add 1/2 cup of the vinaigrette and the parsley. Season with salt and pepper and toss to evenly coat.
5. Arrange half of the Citrus-Spiced Red Cabbage on a serving platter. Scatter the potatoes and three-fourths of the watercress over the cabbage and top with half of the bratwursts. Repeat with the remaining cabbage, watercress and bratwursts. Pass the remaining vinaigrette at the table.
Citrus-Spiced Red Cabbage
One 1-pound red cabbage—halved, cored and sliced 1/8-inch thick
1/2 cup fresh lemon juice
1/2 cup fresh orange juice
1/3 cup sugar
1/4 cup duck fat or unsalted butter
1 large onion, thinly sliced
2 teaspoons thyme leaves
1 árbol chile with seeds, crumbled
1/2 teaspoon ground allspice
Kosher salt
Freshly ground pepper
1 1/2 cups dry red wine
1/2 cup port
1. In a large bowl, toss the cabbage, lemon juice and orange juice. Let stand at room temperature for 1 hour, tossing occasionally.
2. Set a large enameled cast-iron casserole over moderate heat for 1 minute. Add the sugar in an even layer and cook without stirring until melted and starting to caramelize, about 3 minutes. Stir in the duck fat. Add the onion, thyme, chile, allspice, 1 teaspoon of salt and 1/4 teaspoon of pepper. Cook over moderate heat, stirring often, until the onion is lightly caramelized, about 7 minutes. Stir in the wine and port and cook over moderately high heat until the liquid is reduced to 2/3 cup, about 5 minutes. Add the cabbage and accumulated juices and 1 teaspoon of salt. Cook over moderate heat, stirring often, until the cabbage is tender and glazed, about 20 minutes. Season with salt and pepper. Serve hot or warm.
Plus: Marcus Samuelsson's Apple Cake
Recipes for Broccoli Stems
Tuesday, November 18, 2014
I'm the kind of cook who hates to waste anything edible. Whether it's the last wedge of lemon, a heel of bread, or some leftover potatoes, I always try to find a way to use everything up. In the spirit of making use of every last bit, I want to share some recipes for broccoli stems.
Many people cut the crowns off their broccoli, cook the florets and toss the stems. However, the stems are perfectly edible. The simplest way to use them is to sauté or roast them right alongside the florets, but I was also intrigued by these dishes that use only the stalks. To prepare stems, I cut off the end and any protruding bits, and peel them with a sharp vegetable peeler (sometimes you need to peel more than one layer to remove the woody exterior). I hope these recipes inspire you to cook every bit of broccoli that you bring home from the store.
I made this Broccoli Stem Salad recipe from Quinciple's blog The Sift, and it was pretty darn good. I added some slivered kalamata olives for an extra kick of flavor. The trick here is to let the stems marinate in the vinaigrette.
Pan-Fried Broccoli Stems from the New York Times sound delicious (and easy to make!).
Bon Appetit offers Sautéed Broccoli with Floret Vinaigrette, a dish from Oxheart restaurant in Houston, TX. This recipe uses the whole broccoli, so isn't really a stem-only recipe, but I bet you could use the technique with a basic vinaigrette and get delicious results.
Also: This recipe from The First Mess for "green goddess" pizza is intriguing--broccoli stem pesto!
Many people cut the crowns off their broccoli, cook the florets and toss the stems. However, the stems are perfectly edible. The simplest way to use them is to sauté or roast them right alongside the florets, but I was also intrigued by these dishes that use only the stalks. To prepare stems, I cut off the end and any protruding bits, and peel them with a sharp vegetable peeler (sometimes you need to peel more than one layer to remove the woody exterior). I hope these recipes inspire you to cook every bit of broccoli that you bring home from the store.
I made this Broccoli Stem Salad recipe from Quinciple's blog The Sift, and it was pretty darn good. I added some slivered kalamata olives for an extra kick of flavor. The trick here is to let the stems marinate in the vinaigrette.
Pan-Fried Broccoli Stems from the New York Times sound delicious (and easy to make!).
Bon Appetit offers Sautéed Broccoli with Floret Vinaigrette, a dish from Oxheart restaurant in Houston, TX. This recipe uses the whole broccoli, so isn't really a stem-only recipe, but I bet you could use the technique with a basic vinaigrette and get delicious results.
Also: This recipe from The First Mess for "green goddess" pizza is intriguing--broccoli stem pesto!
Labels:
food.
recipe.
vegetarian
Turkey Chili for a Crowd
Wednesday, April 02, 2014
Last night, a bunch of work friends came over for a weeknight gathering. I wanted to cook something that was easy, casual, relatively healthy, wallet friendly and fit for a crowd (a tall order, I know). I've recently fallen in love with Citarella's turkey chili (it's really delicious and a bargain at $5 for a hefty serving), and it inspired me to make a batch of chili for the gang. I couldn't find a recipe that seemed like a close match for the Citarella version, so I made up my own. I still have a ways to go to match the Citarella version, but mine was good enough to share with you here.
I served the chili over brown rice ( with a bunch of garnishes for my guests to choose from. I also baked some cornbread (Jiffy!) in a cast-iron skillet to serve on the side. This recipe makes A LOT of chili. It woudl be great for a party or if you want to freeze some for later consumption.
Turkey Chili for a Crowd
Serves 8+
Ingredients
4 tablespoons extra-virgin olive oil
2 medium onions, diced
2 yellow or red bell peppers, seeded and diced
2 to 4 chipotle peppers in adobo, minced, plus 2 tsp. sauce
2 teaspoons cumin
1 teaspoon chili powder
2 pounds ground turkey meat
2 28-oz. can diced tomatoes
1 15-oz. can kidney beans, drained and rinsed
1 15-oz. can pinto beans, drained and rinsed
1 cup corn kernels (I used dehydrated, but fresh, frozen or canned is fine)
Salt and pepper
Garnishes: diced avocado, lime wedges, sliced scallions, grated sharp cheddar, chopped fresh cilantro, sour cream
1. Heat olive oil in a large pot over medium heat. Add onion and bell pepper and sauté until tender, 6 to 8 minutes.
2. Add chipotle peppers, their sauce, and dry spices, and sauté for 2 more minutes.
3. Add ground turkey, breaking it up into small chunks with a spoon. Season lightly with salt and pepper. Stir frequently until meat is no longer pink, 6 to 8 minutes.
4. Add beans, tomatoes, and corn to the pot, and stir well. Bring to a boil, and then reduce heat to a simmer. Cook for at least one hour to let flavors meld. Taste, and season with salt and pepper.
5. Serve over brown rice with garnishes, like diced avocado, lime wedges, sliced scallions, grated sharp cheddar, chopped fresh cilantro, and sour cream.
Familiar Vegetables, New Tricks
Tuesday, January 21, 2014
Recently, I've tried out two recipes that treat familiar vegetables in new-to-me, yet simple ways, and I wanted to share these smart, fresh ways to prepare winter veggies.
Back in December, New York Times columnist David Tanis ran a recipe for mashed butternut squash that I tried and loved: You peel and chop the squash and roast it in a foil-covered baking dish with water. A not-so-healthy dose of butter makes it truly delicious. We paired it with seared duck breasts, and they were a lovely combination.
Another new technique I've discovered is "glazing" potatoes, which I discovered through a recipe for Olive-Oil Glazed Potatoes from the The Gourmet Cookbook. In this instance, peeled, sliced potatoes are sautéed on the stove in a pan of water and oil (I used a cast iron skillet). As the water evaporates, the potatoes are left with a glaze of the oil--they're insanely rich for a dish that only uses two tablespoons of oil. The second time I make them I added fresh pepper and a handful of chopped, fresh parsley for color and a little herbal lift.
Mashed Butternut Squash
From The New York Times
2 pounds butternut squash, peeled, seeded and cut into 1-inch cubes
Salt and pepper
4 tablespoons butter
1. Heat oven to 350 degrees. Put squash cubes in a shallow, wide baking dish. Season with salt and pepper and toss with hands to coat. Pour water in, to a depth of about 1 inch. Dot surface with butter and cover dish tightly with foil.
2. Bake, covered, until squash is tender, about 1 hour. Crush squash to a rough consistency with a potato masher or wooden spoon. Stir to incorporate cooking juices and check seasoning. May be prepared ahead and reheated.
Olive-Oil Glazed Potatoes with Parsley
From the The Gourmet Cookbook
1 lb russet (baking) potatoes (about 2)
1 1/4 cups water
2 tablespoons extra-virgin olive oil
1 garlic clove, minced
1/2 teaspoon salt
freshly ground pepper
handful of chopped, fresh parsley
1. Peel potatoes and halve lengthwise, then cut crosswise into 1/8-inch-thick slices.
2. Combine potatoes with water, oil, garlic, and salt in a 10-inch nonstick skillet and bring to a simmer. Cover skillet and briskly simmer, shaking skillet occasionally, until potatoes are tender and most of water is absorbed, 10 to 12 minutes.
The Best Morning Glory Muffins Recipe
Saturday, February 23, 2013
On a hurried morning a few weeks back, I ducked into a local coffee shop and grabbed a Morning Glory muffin for breakfast. I had forgotten how delicious this classic muffin is, and immediately wanted to make some myself.
After a bit of searching, I decided to try King Arthur Flour's recipe instead of the classic recipe. Morning Glory muffins are said to have originated at the Morning Glory Cafe on Nantucket. First published in Gourmet magazine in 1981, chef Pam McKinstry's original recipe is a little different from King Arthur's version (hers used more sugar and oil and included crushed pineapple). The King Arthur recipe was pretty greasy the first time I baked it, so I cut the oil even further to just 1/2 cup the next time I made them.
King Arthur's site notes that Morning Glory are a great "eat in the car" treat," because they taste great without any additional butter or jam. They also make a great afternoon treat when you want something sweet, and since they're relatively healthy, you don't have to feel guilty about indulging your sweet tooth.
Morning Glory Muffins Recipe
Adapted from King Arthur Flour
1/2 cup raisins
2 cups White Whole Wheat Flour
1 cup brown sugar
2 teaspoons baking soda
2 teaspoons ground cinnamon
1/2 teaspoon ground ginger
1/2 teaspoon salt
2 cups peeled and grated carrots
1 large tart apple, peeled, cored and grated
1/2 cup shredded coconut, unsweetened
1/2 cup chopped walnuts
1/3 cup sunflower seeds
3 large eggs
1/2 cup olive oil
2 teaspoons vanilla extract
1/4 cup orange juice
1. Preheat the oven to 375°F. Line 16-18 muffin tin cups with papers.
2. In a small bowl, cover the raisins with hot water, and set them aside to soak.
3. In a large bowl, whisk together the flour, sugar, baking soda, spices and salt.
4. Stir in the carrots, apple, coconut, nuts and sunflower seeds.
5. In a separate bowl, beat together the eggs, oil, vanilla and orange juice.
6. Add to the flour mixture, and stir until evenly moistened.
7. Drain the raisins and stir them in.
8. Divide the batter among the wells of the prepared pan (they'll be full almost to the top; that's okay).
9. Bake the muffins for 25 to 28 minutes, until they're nicely domed and a cake tester inserted in the center of one of the inner muffins comes out clean.
10. Remove from the oven, let cool for 5 minutes in their pan on a rack, then turn out of pans to finish cooling.
Plenty by Yotam Ottolenghi
Tuesday, January 15, 2013
My sister bought me a copy of Plenty: Vibrant Recipes from London's Ottolenghi
The book is a collection of recipes that Ottolenghi created for his weekly vegetarian cooking column in the Guardian. Ottolenghi makes the kind of vegetarian food that I like best, which is to say vegetarian food that's not trying to be like meat. These dishes could be eaten on their own or as an accompaniment to a piece of fish or meat--they're all packed with spices and fresh flavors.
I made his quesadillas on New Year's Day and enjoyed that they were mostly bean-filled with just a sprinkling of cheese--a heavy dose of cilantro and homemade pico de gallo made them feel fresh. Then the night before last I made his leek fritters with a Greek yogurt and herb sauce and a delicious bulgur pilaf. The pairing was a suggestion from the book and it made for a satisfying meal. I can't wait to cook more dishes from this excellent book.
Bulgur Pilaf from Plenty
Serves 4-6
About 6 tbsp olive oil
4 small white onions, thinly sliced
3 red bell peppers, cut into thin strips
2 1/2 tbsp tomato paste
1 tbsp sugar
2 tsp pink peppercorns
2 tbsp coriander seeds
2/3 cup currants
1 cup medium bulgur wheat
1 3/4 cups water
Salt and black pepper
Handful of chopped chives
1.Heat up the olive oil in a large pot and sauté the onions and peppers together over medium-high heat for 12 to 15 minutes, or until they soften up completely.
2.Next, add the tomato paste, sugar, spices and currants and stir as you cook for about 2 minutes. Add the bulgur, water, and some salt and pepper. Stir to mix, then bring to the boil. As soon as the water boils, cover the pot with a tight-fitting lid, remove from the heat and leave to sit for at least 20 minutes.
3. Finally, fluff up the bulgur with a fork and stir in the chives. If the pilaf seems dry, add a little more olive oil. Taste and adjust the seasoning; it's likely to need more salt and pepper. Serve warm.
Puffed Apple Pancake Recipe
Thursday, December 27, 2012
On Christmas Eve I pulled out my trusty The Gourmet Cookbook to look for Christmas morning breakfast inspiration. I was looking for recipes that would feel right for the holiday, but wouldn't require a bunch of heard-to-find ingredients, since most shops would be closed on the morning of the 25th. I debated molasses pancakes, but decided a puffed apple pancake sounded like the just right choice.
The apples bake into the pancake batter to create a filled pancake with the cake-y consistency. We didn't have ground cloves, so I added a bit of ground nutmeg instead. Next time, I would cook it just a little longer than 20 minutes to get it a bit browner. I'll also cut back on the sugar--the recipe is very sweet (almost dessert-like) as written!
Puffed Apple Pancake
From The Gourmet Cookbook
2 Granny Smith apples, peeled, cored and sliced 1/4" thick
1 T. fresh lemon juice
3 T. packed light brown sugar
4 T. granulated sugar
1/2 t. ground cinnamon
1/2 t. ground cloves
3 T. unsalted butter
3/4 c. whole milk
3 large eggs
2/3 c. all-purpose flour
scant 1/4 t. salt
1/2 t. vanilla extract
1. Preheat oven to 425.
2. In a bowl, toss apples with lemon juice, brown sugar, 3 tablespoons granulated sugar, cinnamon and cloves.
3. Heat 1 1/2 tablespoons butter in a 10-inch ovenproof skillet (Gourmet recommends nonstick, but I used cast iron and it worked out fine). Add apples and cook, stirring occasionally until just tender, about 4 minutes. Transfer apples and any liquid to a wide bowl and let cool.
4. Heat cleaned skillet in oven for 5 minutes. Combine eggs, milk, flour, remaining 1 tablespoon of sugar, salt and vanilla in a blender and blend until smooth.
5. Remove skillet from oven and melt remaining 1 1/2 tablespoon of butter in skillet over moderately high heat. Then pour batter into skillet. Spoon apple mixture evenly over top (some of the apples will sink in).
6. Bake pancake until puffed and golden and a wooden toothpick comes out clean, 15 to 20+ minutes. Sprinkle with powdered sugar to make it pretty!
Apologies to Ina Garten
Sunday, December 16, 2012
I feel like I owe Ina Garten an apology: For years I didn't think much of her or her cookbooks, but now I think I was mistaken in my prejudice towards the Barefoot Contessa. I'd only ever cooked one of her recipes once, and the one I tried was imprecise in a way that I found frustrating. I felt like her cookbooks were pretty picture books not useful, interesting tools for cooks. Then, a copy of her latest book, Barefoot Contessa Foolproof landed on my desk at work, and I found myself flagging many recipes as ones I wanted to try myself. I followed her turkey instructions at Thanksgiving to much success and last night I test-drove two more dishes were from the book. With three successes, I have officially changed my tune about Ina Garten.
These green beans and a Provencal Tomato Gratin were both simple, delicious recipes I will make again and again. (Note to Costco shoppers: Double the green bean recipe and use a big bag of Costco's French green beans, and use their large container of cherry tomatoes for the tomato gratin.) I followed Garten's suggestion blanch the green beans and make the gremolata in advance and store them separately in the refrigerator. Before dinner, I reheated the beans and tossed them with the gremolata.
So, Ina, for what it's worth: I'm sorry. I hope to spend more time with your recipes and get to know you better.
Green Beans Gremolata
From Ina Garten's Barefoot Contessa Foolproof
Ingredients:
1 pound French green beans (haricots verts), trimmed
2 Tbsp. pine nuts
2 tsp. minced garlic (2 cloves)
1 Tbsp. grated lemon zest (from 2 lemons)
3 Tbsp. minced fresh flat-leaf parsley
3 Tbsp. freshly grated Parmesan cheese
2½ Tbsp. good olive oil
Kosher salt and freshly ground black pepper
Directions:
1. Bring a large pot of water to a boil. Add green beans and blanch 2 to 3 minutes, until tender but still crisp. Drain beans in a colander and immediately put them in a bowl of ice water to stop the cooking and preserve their bright green color.
2. Place pine nuts in a dry sauté pan over low heat and cook 5 to 10 minutes, stirring often, until lightly browned. Set aside.
3. To make gremolata, toss garlic, lemon zest, parsley, Parmesan, and pine nuts together in a small bowl and set aside.
4. When ready to serve, heat olive oil in a large sauté pan over medium-high heat. Drain beans and pat dry. Add beans to skillet and sauté, turning frequently, 2 minutes, until coated with olive oil and heated through. Remove from heat, add gremolata, and toss well. Sprinkle with ¾ tsp. salt and ¼ tsp. pepper to taste and serve hot.
Recipe Hunt: Delicata Squash
Friday, December 07, 2012
I remember the first time I ate delicata squash. It was at one of the Natural Gourmet Institute's Friday night dinners, and I thought, "What is this funny squash, and why hasn't it been peeled?" Since then, delicatas have become more common, and I seem them on menus all over the city.
I love winter squash in general, but I've fallen hard for the delicata squash for one simple reason: You don't have to peel them! Yes, it's not that hard to peel a squash, but for a weeknight meal, it sure is nice to skip that step. I did a little hunting and dug up five delicata squash recipes to try -- some are easier than others, but none of them require peeling!
Winter Squash with Spiced Butter from Bon Appetit.
Delicata Squash Salad with Kale and Cranberry Beans from Whole Living.
Delicata Squash and Roasted Mushrooms with Thyme from the late great Gourmet.
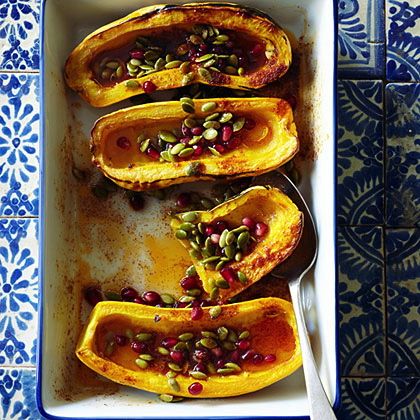
Roasted Delicata Squash with Honey, Pomegranate Seeds, and Pepitas from Sunset.
Roasted Chicken Thighs With Delicata Squash from Melissa Clark's column for The New York Times.
I love winter squash in general, but I've fallen hard for the delicata squash for one simple reason: You don't have to peel them! Yes, it's not that hard to peel a squash, but for a weeknight meal, it sure is nice to skip that step. I did a little hunting and dug up five delicata squash recipes to try -- some are easier than others, but none of them require peeling!
Winter Squash with Spiced Butter from Bon Appetit.
Delicata Squash Salad with Kale and Cranberry Beans from Whole Living.
Delicata Squash and Roasted Mushrooms with Thyme from the late great Gourmet.
Roasted Delicata Squash with Honey, Pomegranate Seeds, and Pepitas from Sunset.
Roasted Chicken Thighs With Delicata Squash from Melissa Clark's column for The New York Times.
Awesome Apple Galette
Wednesday, November 28, 2012
I'd originally planned to make a recipe for a brown butter apple tart from Bon Appetit for Thanksgiving, but my lack of a tart pan foiled my plot. Instead, I wheeled out an old favorite, a Galette de Pommes au Calvados from Gourmet magazine. I made this recipe to the letter when it was published in 2003, and it knocked the socks of any ordinary apple pie. While the recipe as it is written is heavenly, I've been making cheater's versions of it ever since.
What makes my tarts "cheater's versions?" Well, for one, I almost always swap store-bought applesauce for the homemade variety in the original recipe. And if I am super-lazy, I just use a frozen puffed pastry in lieu of the made-from-scratch all-butter pastry dough. Plus, I never have Calvados on hand (who does?), so I use good old American bourbon in the applesauce. Even with my shortcuts the tart's still delightfully delicious. This dessert isn't super-sweet, so the leftovers (if there are any) are great for a (semi) decadent breakfast.
Here's how I made my simplified tart this year:
Apple Galette
Adapted from Gourmet
Serves 8+
All-butter pastry dough
1 1/2 c. unsweetened applesauce
1/2 teaspoon finely grated lemon zest
1/8 teaspoon cinnamon
2 tablespoons good-quality bourbon
1 3/4 lb Gala apples
1/3 cup plus 1/2 tablespoon granulated sugar
3 tablespoons unsalted butter, cut into 1/2-inch pieces
1 1/2 tablespoons apple jelly
1 cup chilled heavy cream
1 tablespoon confectioners sugar
1 1/2 tablespoons Calvados
SPECIAL EQUIPMENT: parchment paper; a large baking sheet (at least 14 inches wide)
1. Heat the applesauce, zest and cinnamon in a small sauce pan and simmer for 15 minutes. Let cool.
2. Roll out all-butter pastry dough (or frozen pastry dough) on a lightly floured surface with a floured rolling pin into a rough 16-inch round (1/8 inch thick), then transfer carefully to parchment-lined large baking sheet. Loosely fold in edge of pastry where necessary to fit on baking sheet, then chill, covered loosely with plastic wrap, 30 minutes.
3. Preheat oven to 425°F.
4. While pastry is chilling, peel and core apples, then cut into 1/8-inch-thick slices. Toss slices with lemon juice and 1/3 cup granulated sugar.
5. Put baking sheet with pastry on a work surface and unfold any edges so pastry is flat. Spread applesauce over pastry, leaving a 2-inch border, and top sauce with sliced apples, mounding slightly. Fold edges of dough over filling, partially covering apples (center will not be covered) and pleating dough as necessary. Dot apples with butter, then brush pastry edge lightly with water and sprinkle with remaining 1/2 tablespoon granulated sugar. Bake galette in middle of oven until pastry is golden and apples are tender, 40 to 45 minutes.
6. While galette is baking, melt apple jelly (apricot will do in a pinch!) in a very small saucepan over moderately low heat, stirring.
7. Slide baked galette on parchment onto a rack, then brush with melted jelly and cool.
Serve galette until warm or room temperature with freshly whipped cream.
The Perfect Peach Cobbler
Monday, October 22, 2012
We ended up with a surplus of peaches after a photo shoot last week. The food stylist on set had mentioned that she preferred cobblers to pies, which got me thinking. Digging around on Epicurious.com, I came across this straightforward recipe for peach cobbler, and decided to give it a whirl. The recipe is easy-as-pie (pardon the pun!), and the results we delicious, but not too sweet. I might even agree with the stylist: I might like cobbler as much as pie, if not better. I also want to note that baking mediocre peaches turns them into something really spectacular. I've got a pile of mangoes to tackle next, any ideas?
The Perfect Peach Cobbler
From Gourmet magazine
Ingredients
6 large peaches, cut into thin wedges
1/4 cup sugar
1 tablespoon fresh lemon juice
1 teaspoon cornstarch
For biscuit topping:
1 cup all-purpose flour
1/2 cup sugar
1 teaspoon baking powder
1/2 teaspoon salt
3/4 stick cold unsalted butter, cut into small pieces
1/4 cup boiling water
Directions
1. Cook peaches:
Preheat oven to 425°F.
2. Toss peaches with sugar, lemon juice, and cornstarch in a 2-qt. nonreactive baking dish and bake in middle of oven 10 minutes.
3. Make topping while peaches bake:
Stir together flour, sugar, baking powder, and salt. Blend in butter with your fingertips or a pastry blender until mixture resembles coarse meal. Stir in water until just combined.
4. Remove peaches from oven and drop spoonfuls of topping over them. Bake in middle of oven until topping is golden, about 25 minutes. (Topping will spread as it bakes.)
Butternut Squash, Feta and Pine Nut Salad
Tuesday, October 09, 2012
I made both this simple fall salad and the tomato and corn recipe last week. It's that time of year when meals are transitioning from summer foods (heirloom tomatoes) to fall ones (butternut squash), and a combination of baby arugula, butternut squash, feta, red onion and pine nuts seemed to be just right for the season
Butternut Squash, Feta and Pine Nut Salad
(serves 4)
1 medium butternut squash
1 tablespoon olive oil
salt and pepper
1/4 of a red onion, sliced paper thin
1/4 feta cheese, crumbled
10 oz baby arugula
3 T. pine nuts
homemade vinaigrette*
1. Preheat oven to 425.
2. Rinse and spin the arugula very dry. Place in fridge to keep it crisp.
3.. Meanwhile, soak the red onion in cold water to remove some of its bite.
4.. Prepare the squash: Cut off the stem and base of the squash and use a heavy-duty peeler or a pairing knife to remove the skin. Then slice the squash in half lengthwise and scoop out the seeds. Cut the squash into a 1/2-inch dice.
5. Cook the squash: Toss the squash in a large bowl with the olive oil and generous seasoning of salt and freshly ground pepper. Spread onto two baking sheets so that the pieces of the squash are not touching (this will help them to get nice and caramelized, not mushy). Roast for 30 minutes, stirring the squash halfway through. Remove from oven and let cool to room temperature.
6. Toast the pine nuts in a pan over medium heat until fragrant and golden, 2 to 4 minutes (be careful not to let them burn!). Let cool.
7. Drain the onions and pat dry with a dish towel or paper towels.
8. Put everything into a large salad bowl and toss well with homemade vinaigrette.
* My homemade vinaigrette is a mixture of about 2 T. good dijon mustard, 1/3 c. white wine vinegar, 1 c. olive oil, a pinch of Kosher salt and freshly ground pepper, which I shake up in a glass jar with a lid.
Creamed Corn with Gorgonzola, Tomatoes and Pine Nuts
Thursday, October 04, 2012
These last days of summer produce are bittersweet. I love the last gasps of the warm weather, especially tomatoes and corn. This recipe by Melissa Clark is a fantastic way to enjoy both together. I went a little lighter on the cream and cheese than Clark recommended (and regretted it), so I'm including the recipe as it was originally published. Don't be shy with the basil either -- the lift from the fresh, green herb really makes the dish.
Creamed Corn with Gorgonzola, Tomatoes and Pine Nuts
From The New York Times
Ingredients:
2 ears corn, shucked
1/3 cup heavy cream
3 tablespoons crumbled blue cheese
Freshly ground black pepper (lots of it!)
1/4 cup pine nuts
2 large tomatoes, thickly sliced
Fresh basil, chopped for garnish
1. Scrape kernels off cob. Set a saucepan over medium heat, add kernels and cream, and cook for 5 minutes. Uncover, and cook for another 5 minutes.
2. Stir in blue cheese and pepper; continue cooking uncovered, stirring occasionally, until sauce thickens, about 5 minutes.
3. In a small pan over medium heat, toast pine nuts until fragrant and golden, 2 to 4 minutes.
4. Divide tomato slices among plates, and top with corn. Top with toasted pine nuts; garnish with fresh basil.
Yield: 4 servings as an appetizer or side dish.
Photo: Andrew Scrivani for The New York Times
Labels:
food.
recipe.
The New York Times
The Jewels of New York's Leek Bread Pudding
Wednesday, October 03, 2012
Leek Bread Pudding
From The Jewels of New Yor
Ingredients:
4 T. unsalted butter
4 c. leeks, sliced 1/2-inch thick (white and green parts only)
1/4 t. salt
freshly ground pepper
4 large eggs
2 1/2 c. whole milk
2 1/2 c. heavy cream
nutmeg
2/3 c. shredded comte (or gruyère),
2 loaves brioche (or challah), cubed
2 T. finely chopped chives
1. Preheat oven to 350 degrees
2. In a large skillet, melt butter over medium-low heat; add leeks and season with salt.
3. Cover and cook, stirring occasionally until leeks are soft and caramelized 10-15 minutes; season with pepper to taste.
4. In a large bowl, whisk together eggs, milk, cream, a generous pinch of salt, pepper, nutmeg and comte; add the leeks to the bowl and toss to combine.
5. In a buttered baking dish, line the bottom with the bread.
6. Pour enough of the custard mixture to cover the bread; let soak for about 10 minutes.
7. Place dish into the oven and bake for 30-45 minutes, or until the pudding is set and the top is brown and bubbling.
8. Scatter with chives to serve.
UPDATE: I finally got around to making this recipe in December, and it is a HUGE recipe. I cut everything in half and still filled a 9 x 13 baking dish, which was plenty of bread pudding for 6-8 people. Also, the custard mixtures won't really "cover" the bread, but that's okay, it's nice to have the under layer soft and creamy and the top piece a little crisp.
Fig Tart in California
Sunday, September 30, 2012
When I was out in California to visit my parents at the end of August a nearby fig tree had provided an abundance of figs, so my mother made a fig tart. It was nothing short of delicious. While it's unlikely I'll ever make this treat, since fresh figs cost so much in New York City, I'm sharing this recipe for anyone blessed with a fig tree (which there are apparently an abundance of in Brooklyn.)
The shots here are of my mother making the tart and the tart before it went into the oven. It was just too pretty not to shoot—and then it got gobbled up before I had a chance to capture it baked.
Easy Summer Fruit Tart from the New York Times
Ingredients
1 and 1/2 cups flour, plus more for rolling
1/2 teaspoon salt
4 tablespoons sugar
11 tablespoons cold unsalted butter
1 egg yolk, beaten
2 1/2 to 3 pounds fruit like peaches, nectarines, figs, apricots, plums
6 tablespoons red currant jelly, or other preserves, depending on fruit
1. Blend flour, salt and 2 tablespoons sugar in a bowl or food processor. Dice 8 tablespoons of the butter. Use a pastry blender or two knives to blend flour mixture and butter, or pulse them together in a food processor to make a crumbly mixture. Beat the egg yolk with 3 tablespoons cold water. Dribble it over the flour mixture, then stir or pulse slowly until the mixture starts clumping together. A bit more water may be necessary. Gather dough in a loose ball and form into a disk on a lightly floured surface.
2. Heat oven to 375 degrees. Roll out dough and line a 10-inch loose-bottom tart pan. Line pastry with a sheet of foil and spread pastry weights or dry beans on top. Bake 12 minutes. Meanwhile, melt the remaining butter, cooking it on low until it turns a light nut brown. Pit fruit (except figs) and cut in eighths or, if fruit is small, fourths. After 12 minutes, remove foil and weights from pastry. Return pastry to oven and continue baking until it is lightly browned, another 8 to 10 minutes. Remove pastry from oven and increase temperature to 400 degrees.
3. Brush pastry with preserves. Arrange fruit in tight concentric circles, starting by placing it around the perimeter, skin side down, against the vertical sides of the pastry and standing it up as much as possible. Brush with melted butter. Dust with remaining sugar. Bake about 35 to 40 minutes, until edges have browned but fruit has not collapsed. Cool before serving.